How to Use IPL Hair Removal at Home: Step‑by‑Step Guide
Introduction
Have you always dreamed of having silky soft skin free of all the trouble of shaving and the pain that comes from waxing or spending too much money at salons? You're not the only one! There are many who have suffered from razor bumps, ingrown hairs, and just the frustration of removing hair from unwanted areas. That’s why IPL hair removal devices are getting ever more popular among consumers. But it's not enough to simply purchase an IPL hair removal device – learning how to use it effectively is the key to success!
This manual was written to assist business owners and beauty specialists with the task of teaching their clients how to use IPL hair removal in a safe and proper way. Happy clients bring positive reviews and return visits – take advantage of this guide to increase sales and make your customers feel at home.
How does IPL hair removal work?
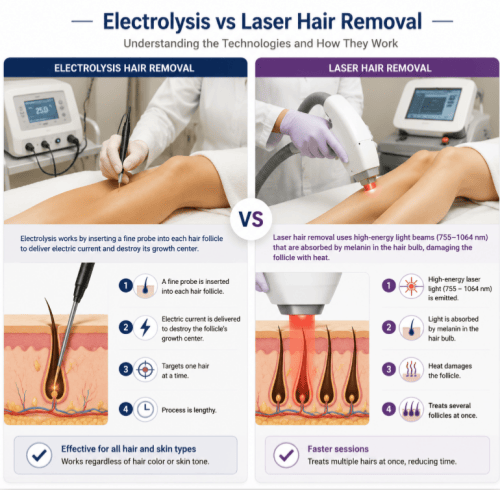
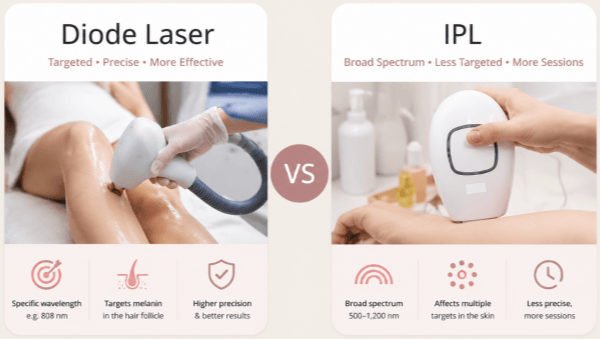
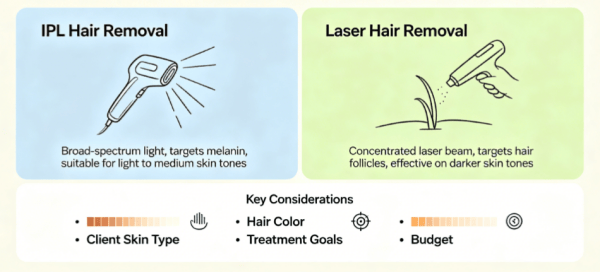
Intense Pulsed Light technology refers to IPL. As opposed to laser therapy, in which only one wavelength is used to target the dark pigment, IPL uses several wavelengths. Once you put the device close to your skin, light energy gets absorbed in the follicles where melanin is present. Heat energy created by the process inhibits hair growth by moving follicles into a resting mode. As a result, with multiple sessions of IPL treatment, hair growth will become finer and slower.
Knowing how the process takes place is necessary to understand how to conduct IPL hair removal. Here is a simple trick that helps achieve the best results with the method – the light will only affect active hair follicles with melanin in them. Therefore, you need to make sure to shave before your session (do not wax).
Step 1: Check Whether You Are Suitable for IPL Treatment
Although home IPLs are completely safe, not all people can use them. In order to start using IPL hair removal equipment correctly, you need to consider the following contraindications first.
✅ Suitable User
- Skin type: Fair or medium/medium brown skin tone (Fitzpatrick types I – IV)
- Hair color: Black or brown hair (blond, red, white or gray hair do not respond well)

❌ DO NOT use IPL if you:
- Have darker skin type (Fitzpatrick V – VI), since burns and hyperpigmentation may occur.
- Are pregnant, nursing, or having periods due to hormonal changes.
- Have sensitive skin because of photosensitive conditions like lupus, porphyria, or light-induced epilepsy attacks.
- Take any medication which makes you sensitive to light like some types of antibiotics, St. John’s wort, or retinoids.
- Have eczema, psoriasis, active wounds, infections, any kind of tattooing on the treatment zone.
- Had a sun or artificial tanning in 2 – 4 weeks before. It is necessary to wait until skin loses a tan.
- Tend to form keloids after treatments.
Useful Tip: If you are not sure, make a test patch as described below.
Step 2: Pre-Treatment Preparation
It is important that you prepare yourself appropriately both to ensure safety and effectiveness. The following section shows how you can properly prepare for IPL hair removal, step by step.
1. Remove Visible Hair – the Proper Way
Before getting IPL treatment, shave the treated skin area 1-24 hours ahead. Make sure that you use a razor that is sharp and clean. Leave about 1mm of stubble, but do not cut off too much.
Do not wax, tweeze, or treat with depilatories before or during your entire course of treatment. These techniques remove the hair root from which IPL flashes cannot get rid of the hair.
2. Wash Your Skin
Wash the treated skin thoroughly with water and mild soap in order to remove any creams, perfume, make-up, deodorant, oil, and other cosmetics from it.
Dry the skin well. Apply nothing else prior to flashing.
3. Have a Patch Test (Important for New Users)
Choose a relatively invisible area of your body at least 24 hours prior to the entire first session (e.g. the skin on your inner arm or behind the knee).
Select the lowest energy and fire one flash.
After 24 hours, assess whether there are some adverse effects. If you observe none (for example, blistering, constant redness, swelling), you may move on to the treatment. Otherwise, decrease the energy level used.
4. Select an Appropriate Energy Level
Always begin with the lowest energy level (Level 1). In the case of sensitive skin areas (like underarms and bikini zone), you may always keep it low. Gradually increase the energy with the legs and arms after several treatments.
Step 3: Correct Usage While Treating
This is where we get into the nitty-gritty of home IPL hair removal techniques. Here’s what you have to do.
| Step | Action | Common Mistake |
|---|---|---|
| Power on | Plug in the device (most home IPL units need to be connected to mains power). Turn it on. | Using an uncharged battery model without checking battery level → may not deliver full energy. |
| Wear protective eyewear | Always use the safety glasses provided. Never stare at the flash. | Closing eyes is not enough; the bright light can still be harmful. |
| Apply the treatment window | Place the device flat and perpendicular (90°) against your clean, dry skin. Press firmly until the skin contact sensor lights up. | Holding it at an angle → flash may not fire, or energy is wasted. |
| Choose firing mode | - Glide mode: Press and hold the button while sliding slowly over large areas (legs, arms). The device will automatically fire repeated flashes. - Stamp mode: Press the button once for a single flash, then move to the next spot. Ideal for small areas (upper lip, fingers, bikini line). |
Moving too fast → missed areas; moving too slow → overlapping flashes on same spot. |
| Overlap slightly | Each flash covers a small window. Overlap each shot by about 1/3 to avoid gaps. | Random flashing leaves untreated patches. |
| Do not flash twice | Fire only once per spot. Firing twice on the exact same area can cause burns. | “Just to be sure” double flashing ❌ |
| Clean the device after use | Wipe the treatment window and body with a dry cloth or a cotton swab dipped in 70% isopropyl alcohol (after it has cooled down). | Leaving residue on the window reduces energy output for next time. |
Tips: To ensure maximum energy transfer, do not move while firing. Stay in place for about 0.5 seconds, then move to the next spot.

Step 4: Skin Care After IPL
Proper post-procedure skincare is equally crucial as the procedure itself. Here is how to use IPL hair removal aftercare.
Immediate Post-care Tips (within the First 24 Hours)
✅ Do:
Put some aloe vera gel or a fragrance-free moisturizing lotion on the skin to alleviate warmth or mild reddening.
Keep it clean and dry.
❌ Don’t:
Take a bath, sauna, hot tub, or swim in chlorine or salty waters.
Do intense exercises making you sweat profusely.
Put on any lotions, creams, retinoids, perfumed deodorants, and AHAs/BHAs on the treated area.
Long-Term Protection – Sunscreen is a MUST
Protection from Sunlight – Apply Sunscreen EVERY Day
Your skin will be sensitive to the sun for at least 7 days following the treatment:
Avoid sun exposure whenever possible.
Apply sunscreen (broad-spectrum SPF 50+) daily on affected areas.
Use long clothes when going outside.
Lack of sunscreen protection can cause hyperpigmentation (skin darkening) which will be hard to treat.
Step 5: IPL Frequency and Regularity – Key Points
The second major component in the "how to use IPL hair removal" question is how often should it be done. You should understand that hair follicles go through different phases: anagen (growth), catagen, and telogen (resting). The IPL laser works only with follicles in the anagen phase.
At any given moment, not more than 15-30% of your hair is growing.
Recommended Schedule
| Phase | Frequency | Duration | Expected Results |
|---|---|---|---|
| Initial phase | Once a week (every 7 days) | 8–12 weeks | Week 4: Hair grows slower, becomes sparser Week 8: 60–70% reduction Week 12: 80–90% reduction |
| Maintenance phase | Once every 1–2 months | Ongoing | Any regrowth is fine, light, and barely visible |

Tips for Different Body Areas
The proper application of IPL hair removal for certain body parts enhances efficiency and comfort.
| Body Area | Recommended Mode | Energy / Intensity Level | Key Tips & Precautions |
|---|---|---|---|
| Legs (Large areas) | Glide mode (slide continuously from ankle to knee, then knee to thigh) | Start low, can increase later | Takes about 5–7 minutes per leg. Keep the device moving steadily. |
| Underarms | Stamp mode | Begin with low intensity | Lift your arm to stretch the skin. After several treatments, many users notice reduced body odor because less hair means less bacterial adhesion. |
| Bikini Line | Stamp mode (use small-area attachment if available) | Low to medium (sensitive area) | Apply a cold pack for 30 seconds before treatment to reduce discomfort. Do not use inside mucous membranes (labia, anus) – only on external skin. |
| Upper Lip / Face | Stamp mode (smallest area tip) | Minimum energy level | Avoid the eye area entirely (wear protective goggles). Do not use on dark moles, freckles, or tattooed areas on the lips. |
| Arms | Glide mode | Low to medium | Smooth, continuous sliding works best for the larger surface of the arms. |
| Fingers & Knuckles | Stamp mode (small window) | Low | These bony areas require good skin contact – stretch the skin slightly if needed. |
Common Mistakes and How to Avoid Them
Even when you know how to use IPL hair removal, mistakes happen. Here are the top 5 errors:
| Mistake | Why it’s wrong | The fix |
|---|---|---|
| Skipping the patch test | Risk of unexpected burn or allergic reaction. | Always test 24 hours in advance. |
| Waxing instead of shaving | Removes the hair root → IPL has nothing to target. | Only shave before treatment. |
| Using high energy from day 1 | Causes pain, redness, or burns. | Start low and increase slowly. |
| Inconsistent schedule | Missed weeks allow hairs to grow back fully. | Set a weekly reminder. |
| Forgetting sunscreen after treatment | Leads to dark spots (hyperpigmentation). | Apply SPF 50+ daily for a week. |
Conclusion
The information in this guidance will provide all that is necessary for instructing your clients about the proper usage of IPL hair removal systems. Educated clients produce better outcomes → increased faith in your brand → repeat purchases from your clients. Leverage this tool by decreasing returns, building customer loyalty, and generating revenues.
Ready to expand your product line to include IPL systems? Jingyue can provide for discounted pricing and training materials at no additional cost.
Frequently Asked Questions: About how to use IPL laser hair removal at home
1. "Can IPL burn my skin?"
Most home IPL devices feature skin tone and contact sensors for added safety. With appropriate preparation (shaving), no tanned skin exposure, and single-flashing, the risk of burns is virtually non-existent. The only sensation felt is that of warmth from flashing.
2. "Is it possible to remove hair permanently?"
According to FDA regulation, the outcome should be considered "permanent hair reduction." After going through the initial 8 to 12 weeks of treatment, one can expect to achieve 80 to 90 percent reduction. The remaining 10 to 20 percent will be light-colored and fine and grows slowly.
3. "I’ve done three IPL sessions and notice no difference – why?"
Hair follicles need to be active. It takes 4 to 6 weeks to notice the difference since the hair must grow enough to be visible and catch IPL flashes. Complete a full 8 weeks of sessons before drawing any conclusions.
4. "Will IPL hurt? Does it work for sensitive skin?"
The most common description of sensations from IPL flashing is that of a "warm snap." People with sensitive skin may try using an IPL device with ice-cooling features. Also, always start at a lower energy level and do a patch test before treating the whole area. Do not apply IPL to damaged and eczematous skin.
5. "Do men use IPL on their faces, chests, and backs?"
Men do have beards and hair all over the chest and back. Be careful with male facial hair as it is thicker than women's and may require more energy levels. Stay away from the eyes if targeting the beard and stick with the hair under the cheekbones.
The Professional’s Guide to Laser Hair Removal: What Spas and Clinics Need to Know
How Often Can You Use IPL Hair Removal at Home? The Complete Frequency Guide
Related Article